Create My Own Mission
Selecting the device and mission settings
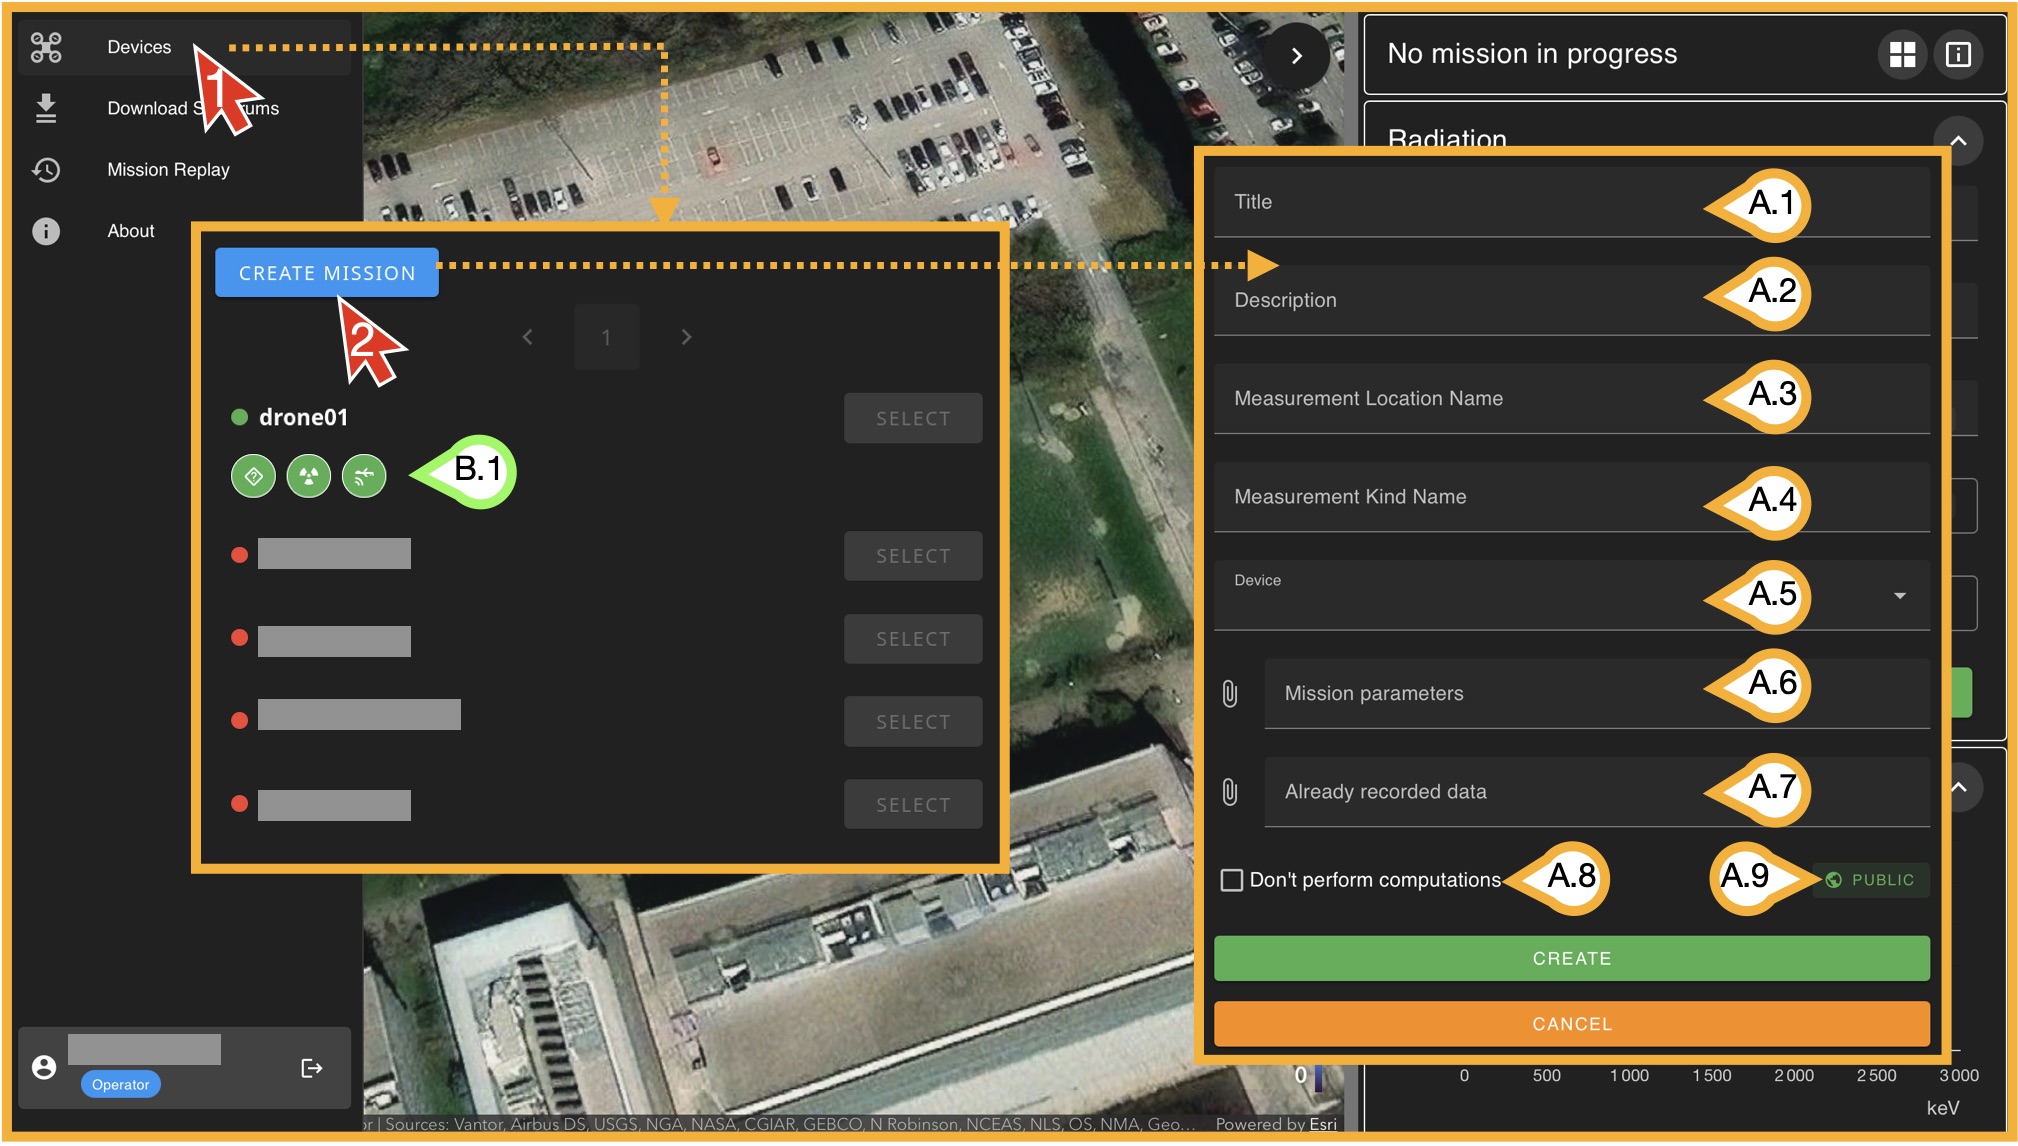
To start a mission, click on Devices and then on Create Mission. A new window will open with several input fields that define the mission.
- (A.1) Title: The name that will be displayed for this mission in the database.
- (A.2) Description: A general description of the mission.
- (A.3) Measurement Location: The name of geographic location or area where the measurement is being performed.
- (A.4) Measurement Kind: The type of measurement (for example, test, calibration, operational, etc.).
- (A.5) Device: Select one of the available online devices. Only devices showing (B.1) three green status icons can be used.
- (A.6) Mission Parameters: Configuration parameters for the mission. These are explained in detail later in this section.
- (A.7) Already Recorded Data: This option allows you to add .N42 files to the current starting missión in case you want them. Note this allows you to load your "own missions" that where recorded out of RimaSPEC.
- (A.8) Don't perforn computations:This is directly related with (A.7). If you load yout own .N42 files, they can be updated with the selected Mission Parameters, if you DO NOT want this, mark this box.
- (A.9) Public/Private: If "Private" is selected, this mission will be stored in your user data base and not visisble to other operators.
Once all fields are completed, click on Create. You will then enter an environment that is very similar to the mission replay view, but now operating in live mission mode. This view includes two additional panels that were not covered in the previous section and are specific to mission execution. Once the mission is created you will se something like this:
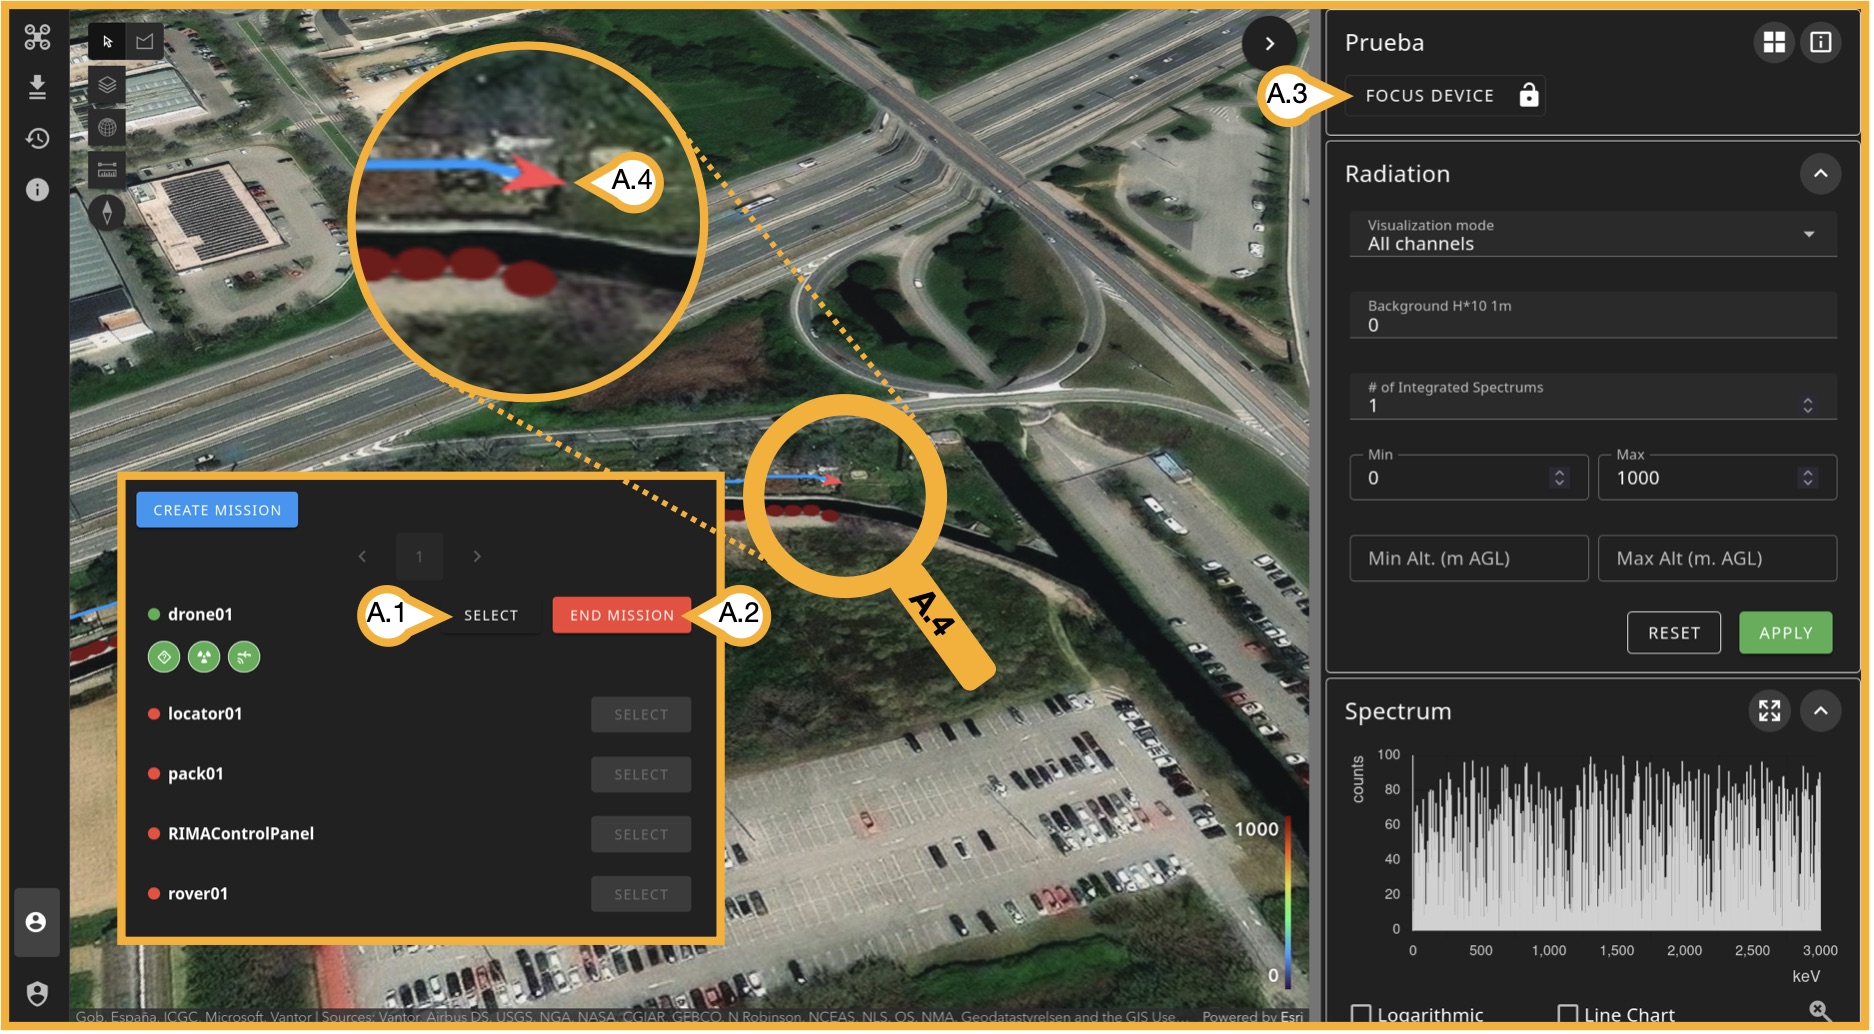
You can always open the small Devices window and Create Mission by clicking the drone icon in the upper-left corner:
- (A.1) Select: Use this to select a mission that has already been created with that device. If you leave the mission, you can return to this window and select it again. If it doesn’t work, refreshing the page usually solves the issue.
- (A.2) End Mission: Stops the current mission.
- (A.3) Focus Device Location: Centers the map on the device’s location. Click the lock icon (lock_open/lock) to always keep the map centered on the device’s location.
- (A.4) Device Location: The device is shown as a red arrow indicating its current orientation.
On-mission special subpanels
Telemetry & Device Status (Metrics)
This panel is not exclusive to active missions; it provides an instant overview of both the drone and device status. The device refers to the computer (Raspberry Pi) installed on the drone, or the one connected to the equipment. During a mission replay, the panel displays information from the last recorded position in the time series. In real-time mode, it shows the live status of the drone and device.
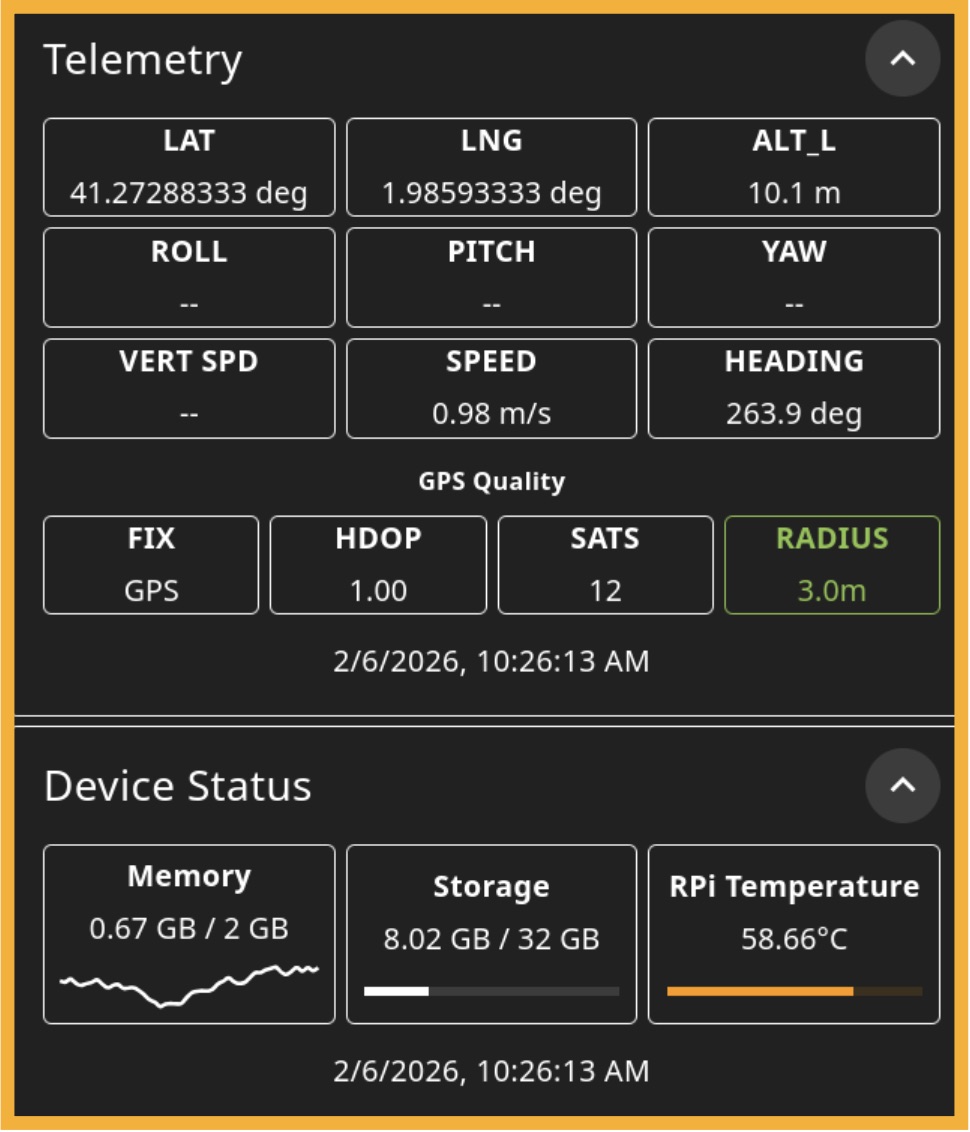
Telemetry
- LAT & LNG: Refers to standard Latitude and Longitude.
- ALT / ALT_R / ALT_L: Click in this box to switch amongst them:
- ALT: Absolute altitude
- ALT_R: Relative altitude to drone's stating point
- ALT_L: Laser-given altitude based on terrain and drone's laser mearurement to ground.
- VERT SPD: Numeric derivative of absolute altitude over time.
- SPEED: Sum of numeric derivative of position over time (Δx/Δt+Δy/Δt), gps given.
- HEADING: Device direction based on geográfic north as 0°.
- FIX: The type of position methods among aviablable (Inertial, GPS, GNSS, RTK, PPK).
- HDOP: Measures the geometric quality of a GPS satellite configuration in the sky. Horizontal Dilution of Precision (HDOP) is a factor in determining the relative accuracy of a horizontal position. The smaller the dilution of precision number, the better the geometry.
- SATS: Number of satellites seen by the drone's GPS.
- RADIUS: Radial uncertainty of current position.
Device Status (Metrics)
- Memory: RAM status on device.
- Storage: Storage status on device.
- RPi Temperature: Device's temperature.
The mission parameters
This section will likely be the most technical part of the guide, as it is essential for the operator to understand these parameters in case no expert is nearby. Mission Parameters are loaded as .json files, you must be very careful with punctuation as this is key for this type of files ("", : , , , ; , etc). Here is a list of all the paremeters contained in this file.
| .json File Paramterter | Example Value | Description |
|---|---|---|
| RadDetectorInformation | GammaDetector_38mm | Detector information |
| RadDetectorCategory | Gamma | Detector type |
| RadDetectorSize_mm | 38 | Detector size |
| DefaultLatitude | 41.276438828873104 | Latitude in case of no telemetry |
| DefaultLongitude | 1.9887106876133502 | Longitude in case of no telemetry |
| DefaultAltitude_m | 1 | Altitude in case of no telemetry |
| Energy_CoeffA | -37.04 | A in E = C*ch^2+B*ch + A, where E is energy in keV and ch is the channel. |
| Energy_CoeffB | 5.57 | B in E = C*ch^2+B*ch + A, where E is energy in keV and ch is the channel. |
| Energy_CoeffC | 0 | C in E = C*ch^2+B*ch + A, where E is energy in keV and ch is the channel. |
| FWHMCalibration_EnergyValues | [ 351.9, 661.7, 1173.2, 1332.5, 1460.8, 2615.3 ] | Paried vectors; for each gamma energy, the FWHM measures how wide the detected peak is at half its maximum height. As expected, the FWHM increases with energy. |
| FWHMCalibration_FWHMValues | [33.2, 44.0, 58.0, 62.0, 67.0, 93.0] | |
| MMGCRatioA | 17.9 | A in MMGC = cps_low - A*cps_high + B |
| MMGCRatioB | 0 | B in MMGC = cps_low - A*cps_high + B |
| MMGCLow | 200 | "cps_low" is the sum of cps from {E=MMGCLow} to {E=MMGCMid} |
| MMGCMid | 1340 | - |
| MMGCHigh | 2980 | "cps_hight" is the sum of cps from {E=MMGCMid} to {E=MMGCHight} |
| FactorRefAltitude | 0.008 | |
| DoseInt | Known Constant Dose | |
| H10Int | 0 | Known Constant H10 |
| DoseCosmic | 0 | Known Constant Cosmic Dose |
| H10Cosmic | 0 | Known Constant Cosmic H10 |
| DoseRadon | 0 | Known Constant Radon-related Dose |
| H10Radon | 0 | Known Constant Radon-related H10 |
| EnergyR1Low | 30 | Dose is calculated in energy 3 regions: Dose(cps)= B*cps + A if E in {R1Low,R2Low} Dose(cps)= F*cps^5+ E*cps^4 + D*cps^3 + C*cps^2 + B*cps + A if E in {R2Low,R3Low} Dose(cps)= D*cps^3 + C*cps^2 + B*cps + A if E in {R3Low,R3High} |
| EnergyR2Low | 55 | |
| EnergyR3Low | 350 | |
| EnergyR3High | 3000 | |
| DoseCoeffR1A | 289.49 | A in Dose(cps)= B*cps + A if E in {R1Low,R2Low} |
| DoseCoeffR1B | -2.0699 | B in Dose(cps)= B*cps + A if E in {R1Low,R2Low} |
| DoseCoeffR2A | -8.4577e-13 | A in Dose(cps)= F*cps^5+ E*cps^4 + D*cps^3 + C*cps^2 + B*cps + A if E in {R3Low,R3Hight} |
| DoseCoeffR2B | 8.985e-10 | B in Dose(cps)= F*cps^5+ E*cps^4 + D*cps^3 + C*cps^2 + B*cps + A if E in {R3Low,R3Hight} |
| DoseCoeffR2C | -3.45103e-7 | C in Dose(cps)= F*cps^5+ E*cps^4 + D*cps^3 + C*cps^2 + B*cps + A if E in {R3Low,R3Hight} |
| DoseCoeffR2D | 6.8127e-5 | D in Dose(cps)= F*cps^5+ E*cps^4 + D*cps^3 + C*cps^2 + B*cps + A if E in {R3Low,R3Hight} |
| DoseCoeffR2E | -5.51214e-3 | E in Dose(cps)= F*cps^5+ E*cps^4 + D*cps^3 + C*cps^2 + B*cps + A if E in {R3Low,R3Hight} |
| DoseCoeffR2F | 2.2321e-1 | F in Dose(cps)= F*cps^5+ E*cps^4 + D*cps^3 + C*cps^2 + B*cps + A if E in {R3Low,R3Hight} |
| DoseCoeffR3A | 1.3604e-10 | A in Dose(cps)= D*cps^3 + C*cps^2 + B*cps + A if E in {R3Low,R3High} |
| DoseCoeffR3B | -1.7289e-6 | B in Dose(cps)= D*cps^3 + C*cps^2 + B*cps + A if E in {R3Low,R3High} |
| DoseCoeffR3C | 7.9658e-3 | C in Dose(cps)= D*cps^3 + C*cps^2 + B*cps + A if E in {R3Low,R3High} |
| DoseCoeffR3D | -1.8388 | D in Dose(cps)= D*cps^3 + C*cps^2 + B*cps + A if E in {R3Low,R3High} |
| CRnP | 0 | |
| EnergyMinBi214 | 1650 | Min energy for Bi-214 detection |
| EnergyMaxBi214 | 1870 | Max energy for Bi-214 detection |
| EnergyMinK40 | 1360 | Min energy for K-40 detection |
| EnergyMaxK40 | 1570 | Max energy for K-40 detection |
| EnergyMinTl208 | 2500 | Min energy for Tl-208 detection |
| EnergyMaxTl208 | 2750 | Max energy for Tl-208 detection |
| EnergyMinCosmic | 3000 | Min energy for cosmic gamma detection |
| EnergyMaxCosmic | 3500 | Min energy for cosmic gamma detection |
| Eff_1460_0 | 0.0011 | Detector efficiency (m2) for 1460 keV energy |
| Eff_1765_0 | 0.0027 | Detector efficiency (m2) for 1765 keV energy |
| Eff_2615_0 | 0.0083 | Detector efficiency (m2) for 2615 keV energy |